Incidents
Use the Incident page to record and view information for a single occurrence of an issue (e.g., failure, planned downing event, customer request, etc.).
If you have permissions to create a new incident, choose Home > Create > Incident.
![]()
If the incident wizard is enabled for the current entity,
the page will either display all fields in a single form or a
wizard that prompts you to enter data one step at a time. To toggle
the display, choose Use Incident
Wizard, ![]() , or Use Single Form,
, or Use Single Form, ![]() .
.
After you have entered all required fields (highlighted with red boxes), choose Home > Incident > Create to save the new record.
![]()
Note: New in Version 2021, you can subscribe to receive e-mail notifications whenever an incident, problem, project or CSI record is updated. See Getting Notified when Records Are Updated for more information.
Entity
If your implementation has more than one entity, the fields and options may be configured differently in each. When applicable, a drop-down list at the top of the page allows you to select which entity is currently active before you create a new record.
Incident Type
Depending on the settings for the current entity, you may choose from up to three incident types.
- Serialized Incident - an incident for a specific serialized system.
- Part Incident - an incident that is tied only to a part number, not a specific serialized system.
- Simple Incident - an incident that is not tied to any particular serialized system or part number.
Areas and Fields
The fields in the page depend on the incident type and the configurable settings for the entity. The following topics discuss some types of fields that may be used in each area of the page.
- Incident Summary area - a summary of key details for an existing incident.
- System/Component Information area - in a serialized incident or part incident, information about the system or part that the incident applies to. (The area will also appear if there are custom details within this section.)
- Incident Disposition area - information about the incident that occurred or the issue that may need to be addressed.
- Incident Repair Information area - information about what was done to resolve the issue, including details for any parts that were repaired, replaced, removed and/or found to be failed.
If an application admin has configured additional fields to meet your organization's specific needs, they may be integrated into the areas mentioned above or grouped together in a separate Incident Details area at the bottom of the page.
Serial Number and/or Part Number
In a serialized incident or part incident, there are multiple ways to specify the system or part that the incident pertains to. (See Part and Serial Number Selection Utilities.)
If the incident is not related to a specific system or part, you can leave the fields blank. Alternatively, you can hide the "System/Component Information" area by selecting "Simple Incident" for the incident type.
If you choose to specify this info, it cannot be changed after the incident is saved.
Responsible Part(s)
The Responsible Part field identifies the part(s) that caused the incident to occur. This field uses the system template(s) defined for the current entity.
If the settings for the current entity allow you to select multiple
parts, click the Edit
icon, ![]() , to view the tree. If the entity is
configured to require a single responsible part, you will just
see a drop-down list of parts that have an owner.
, to view the tree. If the entity is
configured to require a single responsible part, you will just
see a drop-down list of parts that have an owner.
Click the History icon,
![]() , to view a list of any changes to the responsible
part that have been saved for the incident. (This field is required
and cannot be disabled or hidden.)
, to view a list of any changes to the responsible
part that have been saved for the incident. (This field is required
and cannot be disabled or hidden.)
Incident Owner and Creator
Users who have the required permission can set or modify the incident owner and creator fields using the drop-down list.
If you create a new incident without selecting the owner or creator, these fields will be set automatically when you save the record:
- Owner will be set to the owner of the first responsible part that has a part owner.
- Creator will be set to the user who created the incident.
Depending on the configurable settings for the entity, the incident owner may receive e-mail notifications when the incident is created, when actions are created for the incident, etc.
Team Members
If enabled for the current entity, the Team Members field identifies the users who will be working on the issue, and their roles on the team. This field is not displayed until the record is created. (See Assign Team Members Utility.)

You can click the link for any team member's name to send an e-mail regarding the record. (See Send E-Mail Utility.) Depending on the configurable settings for the entity, team members may also receive e-mails when a status update is added or modified. (See "Status Updates.")
Tip: If the Audience Restriction field is enabled for the entity and you select "Attorney/Client Privilege," the record will be visible only to the owner and team members. You will also be prompted to select a user for the "Legal" role on the team.
Actions
An Actions field contains a list of specific assignments that need to be tracked and completed. If enabled for the entity, this type of field is not displayed until the record is created.
Click Create New Action,
![]() ,
to add a new assignment for the current incident. (See Actions.)
,
to add a new assignment for the current incident. (See Actions.)
The table displays the actions that have already been assigned.
Click the action number link to open the action window, or click
the expand icon, ![]() , to
show more of the details in the table. Click
, to
show more of the details in the table. Click ![]() to view the list of actions in a report grid that you can filter,
sort, export to Excel, etc.
to view the list of actions in a report grid that you can filter,
sort, export to Excel, etc.

Status Updates
If enabled for the current entity, a Status field allows users to add notes about the progress made for the incident, and also send e-mail notifications if applicable. This type of field is not displayed until the record is created. (See Status Fields.)

Associated Files or Links
If enabled for the current entity, an Associated Files field allows users to upload file attachments, links to files in another location (e.g., a document management website) or link to another record in XFRACAS. This type of field is not displayed until the record is created. (See Attachments.)

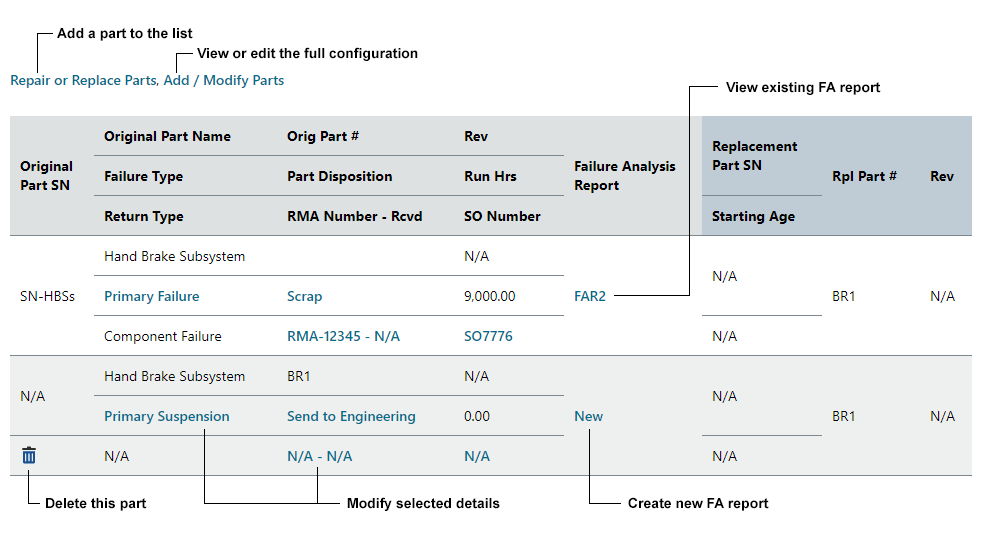
Repairing or Replacing Parts
The Repair or Replace Parts feature allows you to list all the parts that were repaired, replaced, removed or found to be failed due to the incident (if any). If you are extracting data to Weibull++, this is used to obtain failure and suspension times based on part number. (See Repair or Replace Parts Utility.)
Assigning an Incident to a Problem
The Assigned to Problem # field in the incident summary links to any problems that the incident is associated with.

New Problems
Click Create New Problem,
![]() ,
to create a new problem record and automatically assign the incident
at the same time.
,
to create a new problem record and automatically assign the incident
at the same time.
Depending on the configurable settings for the entity, certain fields from the incident may be used to automatically populate fields in the new problem. These fields include:
- The responsible part, which may be transferred to the problem's Part Category Code field. Note that this field can only contain a single part; therefore, if the incident has multiple responsible parts, only the first one will be transferred.
- The incident's title, which may be transferred to the problem's Title field.
Existing Problems
Click Assign/Remove Problem,
![]() ,
to assign the incident to an existing problem or change the problem(s)
that the incident is currently assigned to.
,
to assign the incident to an existing problem or change the problem(s)
that the incident is currently assigned to.
Note: New in Version 2021, you can now assign large groups of incidents to a new or existing problem via an incident report or chart. See Associating Multiple Incidents to Problems from Reports and Charts to learn more about this feature.
Adding or Editing a Failure Analysis Report (if Applicable)
You can use the Initial Failure Analysis field in the incident to record a summary of the analysis that was performed in the field to determine which parts to repair or replace. In addition, if you want to create a more detailed failure analysis report for a particular part after it is returned, click the New link in the table in the Incident page. If a report already exists for a part, the link will display the record ID instead.
Closing an Incident
Depending on the settings for the current entity, the incident's State field may contain one or multiple options to indicate that an incident is closed (e.g., "Closed," "Closed - Insufficient Data," etc.).
- Only users who have certain permissions can close an incident.
- You may not be able to close an incident until all associated actions are completed and/or all associated failure analysis reports are closed.
- The incident may be "read-only" after it is closed. When that preference is enabled, only users with specific permissions will be able to re-open a closed incident.
Tip: If the incident pertains to a serialized system that you are also tracking via the Customer Support page, we recommend to update the System Status (e.g., "Running," "Down - Waiting on Part," etc.) before you close the incident. The system status displayed in the CSI page will be based on all incidents reported for that serialized system.
Related Topics and Links
- Incident Summary Area
- System/Component Information Area
- Incident Disposition Area
- Incident Repair Information Area
- Associating Multiple Incidents to Problems from Reports and Charts
- Repair or Replace Parts Utility
- Replacing a Part
- Repairing, Removing or Marking a Part as Failed
In this Topic
- Entity
- Incident Type
- Areas and Fields
- Serial Number and/or Part Number
- Responsible Parts
- Incident Owner and Creator
- Team Members
- Actions
- Status Updates
- Associated Files and Links
- Repairing and Replacing Parts
- Assigning an Incident to a Problem
- Adding or Editing a Failure Analysis Report (if Applicable)
- Closing an Incident