Defined Names
In the spreadsheet module for ReliaSoft Workbooks and general spreadsheets in Weibull++ folios, you can create variable names that reference specific spreadsheet cells. The names can then be used in any formula or function within the same workbook.
For example, say you want to obtain the reliability of a Weibull++ data set. The operating time is stored in cell B5 of the spreadsheet:
=RELIABILITY(“Weibull!Bulb!Data1!”$B$5))
You can create a defined name for the operating time to make the formula easier to understand and maintain. In this case, the formula might be rewritten as:
=RELIABILITY(“Weibull!Bulb!Data1!”OpTime)
You can then use the defined name OpTime in any other formula in the workbook that requires the operating time.
Syntax Rules for Names
- The first character of a name must be a letter or an underscore. The remaining characters can be letters, numbers, periods and underscores. Names are not case sensitive.
- Spaces are not allowed as part of a name. An underscore ( _ ) or period ( . ) can be used as a word separator.
- Symbols, except for underscores ( _ ), periods ( . ) and backslashes ( \ ), aren't allowed.
Managing Names
To view and manage defined names:
- In ReliaSoft Workbooks, choose Formulas > Defined Names > Name Manager.
- In general spreadsheets, choose Sheet > Format and View > More Settings > Defined Names.
You can then use the New, Edit, or Delete commands in the window to create or modify the names.
Defining Names
There are several ways to define a name.
Define a Name via the Name Manager
This method applies to both ReliaSoft Workbooks and general spreadsheets.
- Select a cell or range of cells.
- Create a new name:
- In ReliaSoft Workbooks choose Formulas > Defined Names > Define Name (or choose Formulas > Defined Names > Name Manager, then click the New button in the window).
- In general spreadsheets, choose Sheet > Format and View > More Settings > Defined Names. Then in the window, click the New button.
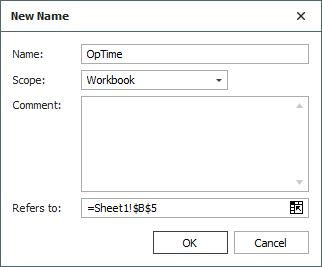
- Type a name into the Name
field. In the Scope
drop-down list, choose whether this name will be used for
the entire workbook or a specific sheet. The Comment
field is optional.
The selected cell/range will already be defined in the Refers to field, but you can click into the spreadsheet and select different cells, if desired.
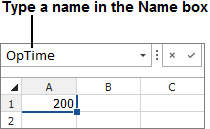
Define a Name via the Name Box (ReliaSoft Workbook Only)
This method applies only to the spreadsheet module of ReliaSoft Workbooks. Select the cell or range of cells, click the Name box and type a name. Press Enter to create the name.
Define a Name via the Selection Command (ReliaSoft Workbook Only)
If the fields are already labeled in the spreadsheet, you can use them to create names.
- Select the cells of interest (including the row or column labels), then choose Formulas > Defined Names > Create from Selection.
![]()
- In the window, select the location of the labels. Click OK.
