Mirroring (Using Blocks in Multiple Locations)
Mirrored blocks allow you to place the same block in more than one location. In other words, mirrored blocks allow you to represent a single component more than once in a diagram or in multiple diagrams within a project. This is useful, for example, when simulating bi-directional paths within the diagram or if the same item performs more than one function and each function has a different reliability-wise impact on the system. The ability to mirror across diagrams allows you to represent situations where a single component's failure affects multiple subsystems that are represented in separate subdiagrams.
Note: For information about using mirror groups for common cause failures in FMRAs, see Add to Mirror Group Window (FMRA).
Mirroring is accomplished by adding blocks to a mirror group. Mirror groups are resources that can be shared among analyses and can be managed via the Resource Manager. The mirrored blocks are treated as fully equivalent multiple instances of a single block, rather than considered as an original and copies.
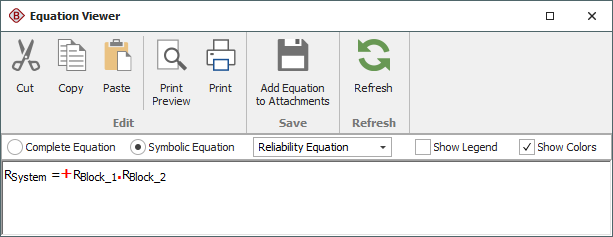
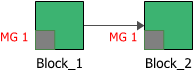
Any changes made to the properties of a block in a mirror group will apply to all other blocks in the mirror group. For analytical diagrams, mirrored blocks have a significant effect on the system reliability equation. Consider a simple RBD like the one shown next.

The system reliability equation for this diagram is shown next.
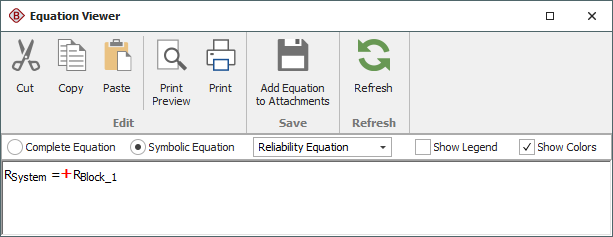
If, however, the two blocks in the RBD belong to the same mirror group, they are actually a single block. The diagram and system reliability equation are shown next.
When a diagram with mirrored blocks is simulated, every event associated with one block in a mirror group will also apply to all other blocks in the mirror group.
Tip: Blocks that belong to a mirror group have a square at the lower left corner of the block. You can change the size of the indicator and the appearance of the text via the relevant Block Corner Indicators page of the Diagram Style window. You can change the color used for each mirror group via the Mirror Group Manager.
The Mirror Group window allows you to create, view and edit mirror groups. It can be accessed from the Mirror Groups page of the Resource Manager by choosing Home > Edit > Add, by selecting a mirror group and choosing Home > Edit > View or by double-clicking a mirror group.
For a new resource, a name will be proposed automatically based on the default naming criteria established for the current database (see Default Name Formats window). You can replace this with your own name, if desired. Remember that the name and identifiers are the primary way in which your team will be able to find the resources you need for your analyses.
You can also enter comments about the mirror group in this window.
For existing resources, the link at the bottom of the window indicates how many times the resource is currently being used. If you need more information, click the link or the icon to open the Dependency Viewer.
![]()
Mirror Group Manager
To add blocks to a mirror group, choose Project > Data Management > Mirror Group Manager.
![]()
The Mirror Group Manager will appear, as shown next.
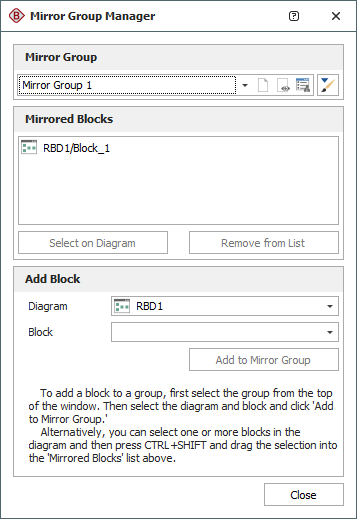
The Mirror Group area allows you to choose an existing mirror group from the drop-down list. In addition, you can click the Select Existing icon to open the Select Resource window. If there is not an existing mirror group that meets your needs, you can create a new one by clicking the Create New icon to open a window that allows you to specify a name for the new mirror group, as well as any comments. Click the View icon to view the characteristics of the selected mirror group.
![]()
You can also click the Indicator Style icon to modify the appearance of the corner indicator that will appear on each block that belongs to the mirror group, including:
- The indicator's background color, fill color and fill style. The background color is the underlying color applied to the indicator; the fill color is applied over the background color in the pattern specified by the fill style.
- The style (e.g., solid, dash, etc.), color and thickness of the indicator border.
You can change the size of the indicator via the relevant Block Corner Indicators page of the Diagram Style window.
The Mirrored Blocks area displays all of the blocks in the mirror group, in the format [Diagram Name]\[Block Name].
- To add a block to the mirror group, you can select the diagram and block in the Add Block area and click the Add to Mirror Group button. You also can select the block(s) in the diagram, press CTRL+SHIFT and drag the block to the list in the Mirrored Blocks area of the Mirror Group Manager. Note that when you add a block to the mirror group, its properties will be updated to match those of any block(s) already in the mirror group.
- To view a mirrored block, select the block in the list and click the Select on Diagram button. The diagram will be displayed with the block selected.
- To remove a block from the mirror group, select the block in the list and click the Remove from List button. The block's properties will not change, but it will no longer be part of the mirror group. Subsequent changes to, or simulation of, other blocks in the mirror group will not affect it.
Note: Adding blocks to or removing blocks from a mirror group changes the configuration of the diagram(s) in which the blocks are located, necessitating reanalysis or resimulation.
By default, a mirrored block in a diagram is identified by a gray box at the lower left corner of the block, and the name of the mirror group is displayed by the box. These settings may be changed via the Block Corner Indicators pages of the Diagram Style window.