FMEA > Criticality
The FMEA > Criticality page of the interface style allows you to customize properties and functionality related to quantitative or qualitative criticality analysis.
Criticality Properties
The table at the top of the page works like the other record properties tables except:
Short Display Name specifies the abbreviation that will be used in some locations within the interface and/or report output where the full display name will not fit.
At least one of these properties must be enabled if you want to perform Criticality Analysis.
Criticality Matrix Priority Highlights
The settings at the bottom of the page allow you to customize the priority highlight colors that will be added to any quantitative or qualitative criticality matrix reports that you generate.
Do the following:
Click the Preview button to create a sample matrix, and then use the drop-down lists to specify the size of the matrix that you will be creating for criticality analyses in this project. For example, if you have configured the project to use the criticality rating scales from MIL-STD-1629A (a five-point scale for Failure Probability and a four-point scale for Severity Class):
The qualitative criticality matrix report will be 5 x 4 (i.e., Failure Probability on the vertical axis and Severity Class on the horizontal axis).
The quantitative criticality matrix will be 10 x 4 (i.e., calculated criticality on the vertical axis and Severity Class on the horizontal axis).
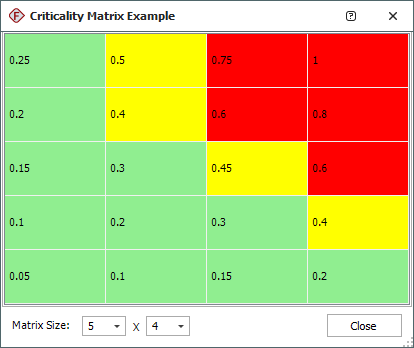
The following picture shows a sample for the MIL-1629A qualitative matrix. Note that the software has assigned a value to each cell such that the smallest number appears in the bottom left corner and the largest number appears in the top right corner. It has also applied the highlight colors based on the thresholds that are currently specified (in this case, .6 for high priority and .4 for medium priority).

If you are not satisfied with the highlights that are shown in the sample, use the numbers in the cells to determine how the threshold values should be changed. For example, in the sample matrix shown above, if you wanted the top left corner of the matrix to be highlighted as medium instead of low priority, you would need to set the medium priority threshold to .25 instead of .4.
Return to the FMEA > Criticality page and enter the new threshold values. Each number must be greater than zero and less than or equal to 1. In addition, the High Priority Threshold must be larger than the Medium Priority Threshold.
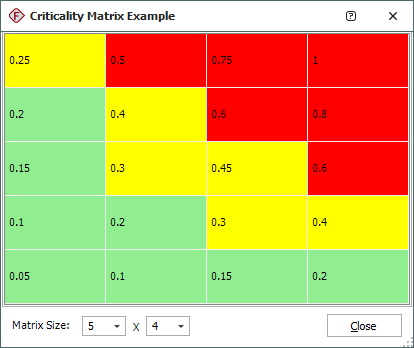
Click the Preview button and set the matrix size again, then check to see if the new threshold values will result in the desired highlight pattern. For example, the following picture shows a new preview for a 5 x 4 matrix in which the high priority threshold has been changed to .5, and the medium priority threshold has been changed to .25. (This picture shows XFMEA, but it works the same in RCM++ and RBI.)

You can repeat this process as many times as needed until you’re able to confirm that the specified threshold values will result in the highlight pattern you prefer for criticality matrix reports.