Managing User Accounts
Every person who will access a ReliaSoft database, be assigned to some role in an assigned action, and/or receive alerts via e-mail or SMS message must have a personalized user account in the database.
- In non-secure databases, the software automatically creates an account for anyone who opens the file. Every user has full permissions throughout the database, including the ability to create, edit or delete other user accounts (e.g., so you can modify contact information or send alerts to someone who has not yet had an account created automatically).
- In secure databases, the accounts must be created and managed by users with the "Manage users and logins" permission. The security group(s) assigned to each account determines what the user can see and do in the database.
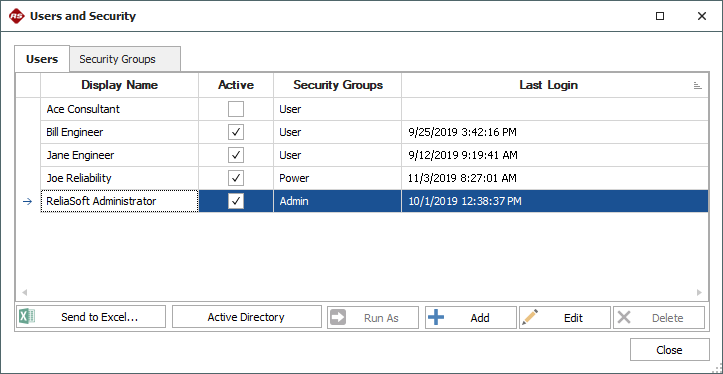
To view and manage the user accounts in a database, choose File > Manage Database > Users and Security.
![]()
This topic describes how to use the Users and Security window to create, edit or delete/deactivate user accounts. The same window can also be used to enable login security for a standard database, and to manage security groups (permissions) for a secure database.
Starting in Version 2020, in enterprise databases, you can click the Report button at the bottom of the Users and Security window to generate an Excel spreadsheet that includes:
- All security groups and the permissions assigned to them.
- All users and the security groups they belong to.
Built-in Find/Filter, Configuration and Grouping Tools
The Users tab of the Users and Security window offers the same filter, column configuration and grouping tools that are built in to other utilities that use a similar grid (e.g., the Analysis Explorer, Actions Explorer, etc.). For details about how to use each feature, see:
Creating and Editing User Accounts
The Users tab of the Users and Security window displays a table of all user accounts that have been created in the database. You can use the Add or Edit buttons below the table to create or modify individual accounts.
You can also import user accounts from Microsoft Active Directory by clicking the Active Directory button. (See Importing Users from Active Directory.)
Keep in mind the following requirements when creating new user accounts for a secure database:
- In order to use Windows authentication, the user must be logged in to a computer with the same domain/username that is defined in the user account. If a user needs to connect to a database from a different domain, you can set up alternative credentials that will allow access without domain authentication. (See Creating Alternative Credentials.)
- In order to access the database, the user account must be assigned to at least one security group. (If you simply wish to send e-mail alerts to the user, a security group is not required.)
- For SQL Server databases, the username must be associated with a "SQL Server Login" that allows the database platform to recognize the user and give access to the application database. This can be accomplished with an individual login, a group login or Windows impersonation. (See SQL Server Logins or Using Windows Impersonation.)
The Run As button below the table allows you to change your current connection to run as the user currently selected in the table. This allows you to test that user's permissions to be sure that they are set as you intended. Depending on the permissions that user has, you may have to close the database and reconnect to it in order to change back to your own account.
Deleting or Deactivating User Accounts
If an account has never been used and you want to permanently remove it, select the account name from the list and click Delete.
If an account has already been logged in at least once (the Last Login column shows this information), attempting to delete the account will deactivate it instead. A deactivated account will not have access to the database.
You can manually deactivate an account by clearing the check box in the Active column for the account. To reactivate the account and give the user access to the database again, select the check box in the Active column.