Building a New Design
The Design tab of the design folio is used to define and then build an experiment design. When you build the design, its "plan" will be shown on the Data tab.
- If you are working with a standard design folio, you will use the Design tab to select a design type, define responses/factors and choose additional settings for the whole design.
- If you are working with a robust design folio, you will make these selections for each of the inner and outer arrays of the design.
- If you are working with a mixture design folio, you will make these selections to specify the design for mixture factors and, if applicable, process factors.
After you create the folio, follow the steps outlined next to build a design from scratch.
Tip:
If you wish to use saved settings instead, choose Design
> Import/Export > Import Template or click the ![]() icon on the control panel. After you import the
settings, you can proceed to the last step to review your settings
and build the design. (See Importing/Exporting
Design Settings.)
icon on the control panel. After you import the
settings, you can proceed to the last step to review your settings
and build the design. (See Importing/Exporting
Design Settings.)
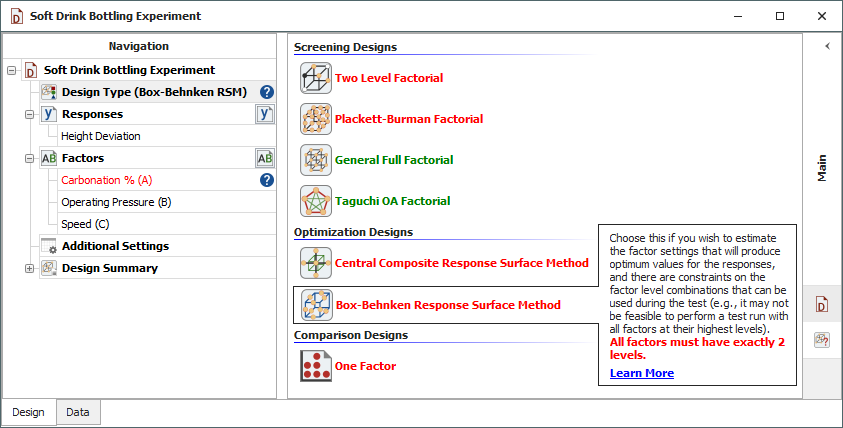
Choose the Design Type(s)
If you are working with a standard design folio, choose one design type for the experiment by clicking the Design Type heading in the navigation panel on the left and choosing an option in the input panel on the right.
If you're using a robust design folio, you need to select two design types (one under the Inner Array heading and another under the Outer Array heading). For considerations in choosing the design types and additional information about settings used in configuring the robust design, see Robust Parameter Designs.
When you first create a design folio, the current factor settings will change as required depending on the design you select. After you directly make changes to the factors, responses or additional settings, the factor settings will no longer change automatically, and the design types will be color-coded in green or red.
If a design is red, then one of the current factor settings is incompatible with it. When you select a red design type, the factor(s) it is incompatible with will become red as well. To find out why the setting is incompatible, read the design type's description. For example, the red text in the design description below says, "All factors must have exactly 2 levels," which indicates that the Carbonation factor (also shown in red) does not have the required number of levels for a Box-Behnken design.
Define the Response(s)
If you are using a standard design folio, you must configure the response(s) that will be measured in the experiment by selecting the response in the navigation panel and editing its properties in the input panel. (See Adding, Removing and Editing Responses.) To perform reliability DOE, select Life Data as the response type for one response. The resulting Data tab will be configured for reliability DOE.
For robust design folios, default response properties will be used to build the design.
Define the Factor(s)
You can change the number of factors by clicking the Factors heading in the navigation panel and choosing an appropriate number in the input panel. You can then define individual factors by selecting the factor in the navigation panel and editing its properties. (See Adding, Deleting and Editing Factors.)
Specify Additional Settings
The options available when you click the Additional Settings heading will vary depending on which design type is currently selected. The following options may be available:
- General Settings
- Replicates allows you to specify the number of test samples you want to observe at each combination. In other words, the number of replicates is the number of times you want to perform the complete set of runs required by the design. Using replicates helps to separate error caused by a poor model fit from error caused by natural variation (i.e., experimental error).
- Repeated Measurements allows you to specify the number of measurements to use for each test run. The mean and standard deviation of the measurements are calculated for each run, and either can be selected as the analyzed response for the experiment. This option is not available for R-DOE or designs with multiple responses.
- Block on Replicates allows you to choose whether you will use each replicate of the design as a block. By blocking on replicates, you can account for "nuisance factors" (i.e., effects that are not of interest to the investigator) due to conditions that differ from one replicate of the design to another. For example, if the first replicate of the design is performed on Day 1, and the second is performed on Day 2, you could account for variation in the response due to the day. This option is available only if the number of replicates in the design is greater than 1.
- Block Settings
- Number of Blocks
allows you to specify the total number of blocks
that will be used in the design. Blocks
per Replicate (shown when you choose to block on
replicates) allows you to specify the number of blocks
that will be used per replicate. The more blocks you use
in the design, the more potential nuisance factors you
can account for. Note, however, that using blocks requires
aliasing them with one or more effects.
Select a number of blocks from the drop-down list; the options available in this list depend on the type of design and the number of factors. Using 1 block in the entire design is equivalent to not using blocks.
With Taguchi OA designs, you must block on replicates to use blocks, and you can use at most 1 block per replicate. - Center Points per Block allows you to specify the number of center points that will be used per block. Center points are used primarily to help you determine if there is curvature in the relationship between the factors and the response. In addition, using several center points provides an estimate of pure error.
- Block Name allows you to enter a name for each block.
- Design Generators will appear when you have multiple blocks. This field is used to specify the factorial interaction effects that will be aliased with that of the nuisance factor for which you are blocking the design. (See Specifying Generators.)
- Number of Blocks
allows you to specify the total number of blocks
that will be used in the design. Blocks
per Replicate (shown when you choose to block on
replicates) allows you to specify the number of blocks
that will be used per replicate. The more blocks you use
in the design, the more potential nuisance factors you
can account for. Note, however, that using blocks requires
aliasing them with one or more effects.
- Factorial Settings
- Fraction allows you to select the number of base runs you want to use in the experiment, based on a fraction of the total number of runs that would be required for a full factorial design. For example, if your design includes five factors with two levels each, a full factorial design would require 25 = 32 base runs. For a fractional factorial design in this case, you can select to use a one-half fraction (16 runs) or a one-fourth fraction (8 runs). The total number of runs required for the experiment may be greater than the number of base runs (e.g., if you use replicates and/or center points). (See Two Level Factorial Designs and Central Composite Designs.)
- Design Generators will appear when you are using a fractional design, not a full factorial. It allows you to specify the factorial interaction effects that will be aliased with the main effects of particular factors. (See Specifying Generators.)
- Plackett-Burman Settings
(Plackett-Burman designs only)
- Base # of Runs allows you to specify the number of runs you want to use in the experiment. The available choices are determined by the number of factors you specify and the design matrix developed by Robin L. Plackett and J. P. Burman.
- Taguchi OA Settings
(Taguchi OA designs only)
- The options available in the Taguchi Design Type drop-down list will depend on the numbers of levels for each factor. For example, if all your factors have three levels, then you could choose the L9 (3^4) design, which uses nine runs to investigate up to 4 three-level factors. If some factors have two levels and the rest have four, then you could choose the L16 (2^9*4^2) design, which uses 16 runs to investigate up to 9 two-level factors and up to 2 four-level factors.
- Click the View
Alias Table icon
 to see the
alias table for the selected Taguchi design type. The
table shows what aliases result from assigning factors
to particular columns in the orthogonal array. See Taguchi OA Alias Table.
to see the
alias table for the selected Taguchi design type. The
table shows what aliases result from assigning factors
to particular columns in the orthogonal array. See Taguchi OA Alias Table. - Taguchi Column Indices allows you assign factors to columns of the selected orthogonal array. No two factors can have the same index.
- The Specify Interaction Terms link opens a window that helps you assign factors to columns without aliasing any main effects or any interaction terms of interest. (See Specify Interaction Terms Window.)
- Central Composite Settings
(Central Composite designs only)
- Alpha value allows you to
specify the alpha value that you want to use to determine
the axial points in the design. Options include:
- Rotatable Design: This alpha value ensures that the variation in the response will be the same for all points that are the same distance from the design center point. This makes the model provide equally precise predictions throughout the region of interest, which means that regardless of the direction taken to search for the optimum solution, the result is equally accurate.
- Spherical Design: This alpha value places the axial points on the surface of the sphere defined by the factorial design points (i.e. all design points have the same distance to the center point).
- Orthogonal Block: This alpha value ensures that the effect of the blocking is unconfounded with other effects. This option is available only if you have selected to block the design.
- Face Centered Design: In this case, alpha = 1, which means that all design points will be in the range from -1 to 1.
- Custom: Allows you to specify your own alpha value to meet the constraints of your experiment.
- If you select Yes in the Add axial point block drop-down list, an extra block will be added to the design and used for the axial points.
- Center points / axial block allows you to select how many center points will be added to the axial block.
- Alpha value allows you to
specify the alpha value that you want to use to determine
the axial points in the design. Options include:
- Mixture Settings
(Mixture designs only)
- Mixture Total allows you to specify the total amount of the mixture used for each test run.
- Degree of Design is available only for simplex lattice designs. With a degree of n, each factor will use the values 0, 1/n, 2/n, …, n/n. Therefore, choosing n means each mixture factor will have n + 1 factor levels.
- Degree of Centroid is available only for simplex centroid and extreme vertex designs. With a degree of n, the centroid of n-dimensional space will be added to the design. (For example, the center point of a line is the centroid of a 2-dimensional space.)
- Additional Runs (Mixture
designs only)
- Center Points allows you to specify the number of center points to add to the overall design. A center point is a test run that uses a blend with all components set to the same value.
- Axial per Component (simplex designs only) allows you to specify the number of axial points to add for each component in the design. An axial point is a test run that uses a blend between a center point and a vertex (i.e., a blend with one component set to its maximum value).
- Vertex per Component (simplex designs only) allows you to specify the number of vertex runs to add for each component in the design.
- Axial per Vertex (extreme vertex designs only) allows you to specify the number of axial points to add for each vertex in the design (i.e., a blend with one component set to its maximum value). An axial point is a test run that uses a blend between a center point and a vertex.
- The Blend Combinations
settings (e.g., 2-Blend
Combinations) are available if you have at least
three components in your simplex design. They allow you
to specify how many combinations of N-blend points to
add to the design. For example a 2-blend point is a test
run that includes two components set to equal values,
and any remaining components set to zero. 3-, 4- and 5-blend
combinations may also be available depending on the number
of components in the design.
Note that the specified number is the number of combinations of points to add, not individual points. Thus, if you have three components and choose 1 for the Double Blend, three runs with the following values will be added to the design: (1/2, 1/2, 0), (1/2, 0, 1/2) and (0, 1/2, 1/2). - Linear Constraints (extreme vertex designs only) allow you to define limits on how the components can be combined. See Defining Linear Constraints.
Design for Process Factors
For mixture designs, click Design for Process Factors in the navigation panel and specify whether process factors (e.g., temperature) will also be included in this design. If you choose Yes, more settings become available to specify the design for process factors. The steps for defining this part of the design are similar to those for creating a factorial design.
Rename the Folio
If you wish to rename the folio, click the heading at the very top of the navigation panel and edit the text in the Name field in the input panel. Alternatively, you can right-click the folio in the project explorer and choose Rename from the shortcut menu.
Review Your Settings and Build the Design
You can review some properties of your new design in the Design Information area of the control panel, as shown next.
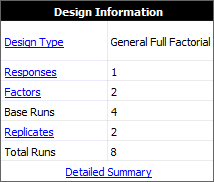
In addition to the Design Type, Responses, Factors and Replicates you chose for the design, the following calculated values are shown:
- Base Runs is determined by the number of factors, the number of levels for each factor and whether you are using a fractional design. For example, if your design is a full factorial design with 3 factors that each have 2 levels, then the number of base runs is 23, or 8. If the factors/levels are the same but you are using a fractional design that uses 1/2 of the runs required for a full design, then the number of base runs is 4 (i.e., 1/2 of the 8 required for the full design).
- Total Runs is the total number of runs that are required for the experiment. This value is determined by the number of base runs, replicates, center points per block, axial points per block and other settings. For extreme vertex designs, this information will not be available until you have validated the constraints.
If you click any link in the first column of this table, you will be able to edit the relevant setting in the input panel. If you wish to see more detailed information about your current design settings, click the Detailed Summary link at the bottom of the table. The Design Summary will provide further information about the design's properties.
You can also use the Design Evaluation tool to help you determine whether a design with the current settings would, for example, be likely to detect the main effects and factorial interactions you are interested in. (See Design Evaluation.)
When you are ready to build the design, choose Design > General > Build Design or click the icon on the control panel.
![]()
This will create a new Data tab in the folio that will be used to enter and analyze response data.