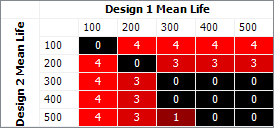
Difference Detection Matrix Example
This section presents an example of how to use the Difference Detection Matrix to estimate the test time required in a reliability life test to demonstrate that a new product design will have a higher mean life than an older design.
A manufacturer plans to implement a new product design that is expected to improve the product’s mean life. The current design is expected to have a mean life of 200 hours, and the new design is expected to have a mean life of 300 hours. A reliability engineer is asked to determine, with 90% confidence, the minimum amount of test time that would be required to determine that there has been an improvement in mean life with the new design. No more than 400 hours will be available for testing, and only 10 units of each design will be available for testing.
The engineer also has some information about the life distributions for both designs. They each have a Weibull life distribution, and the beta parameter for the original design is 4.2, while the beta parameter for the new design is 3.
Follow the steps outlined below to estimate the test time required to detect a difference in mean life.
- Choose Home > Insert > Test Design. In the Test Design Assistant, select Difference Detection Matrix and click OK.
- In the Metric to Compare area of the control panel, select Mean Life and enter 90 for the confidence level.
- Choose Hour for the units that will be used for all time inputs and results.
- In the Design 1 area, enter 10 for the sample size. Design 1 is the original design, so select 2P-Weibull for the distribution and enter 4.2 for the beta value.
- In the Design 2 area, enter 10 for the sample size. Design 2 is the new design, so select 2P-Weibull for the distribution and enter 3 for the beta value.
- The matrix will display a range of possible mean life values for both designs. The range begins with 0 and increases by an increment of your choice. In the Reliability Metric Setup area, enter 500 for the maximum metric time. Then enter 100 for the metric increment. The range of mean life values displayed for both designs will thus be 100, 200, 300, 400 and 500.
- In the Test Time Matrix Setup area, enter 4 for the number of test times that will be evaluated. The software will automatically enter default test times. To view them, clear the Calculate Test Times check box, then click the arrow in the Test Time (hr) box. A table will appear where you can view and modify the test times that will be evaluated. In the table, enter 400 for Test Number 1, 350 for Test Number 2, 300 for Test Number 3 and 250 for Test Number 4.
- Click the Calculate icon to generate the matrix, which will appear as shown next.

According to the above matrix, if Design 1 has a mean life of 200 and Design 2 has a mean life of 300, then a statistically significant improvement in mean life can be detected between the two after analyzing the data of a 300-hour reliability life test.