Show, Tile, Dock and Pin Panels
In all ReliaSoft desktop applications, the MDI includes a Project Manager panel and a My Portal panel. You can decide whether each panel will be displayed and how it will be positioned in the interface at any given time. This topic covers the following:
Show or Hide
To show or hide the Project Manager panel, choose View > Project Manager and toggle the Show Project Manager command on or off.
For My Portal, toggle the View > My Portal > Show My Portal command.
You can also hide either panel by clicking the X at the top of the window.

Tile or View One Page at a Time
In all ReliaSoft desktop applications, My Portal consists of four pages. You have the option to view one page at a time (and use large buttons or small icons at the bottom of the panel to switch between pages) or tile the pages so that more than one page can be visible at the same time. To specify your preference, choose View > My Portal and toggle the Tile My Portal command on or off.
When applicable, these same options are available for the Project Manager panel. Choose View > Project Manager and toggle the Tile Project Manager command on or off. (This command is not available in applications such as XFMEA, RCM++, RBI and MPC, which have only a single page in the Project Manager.)
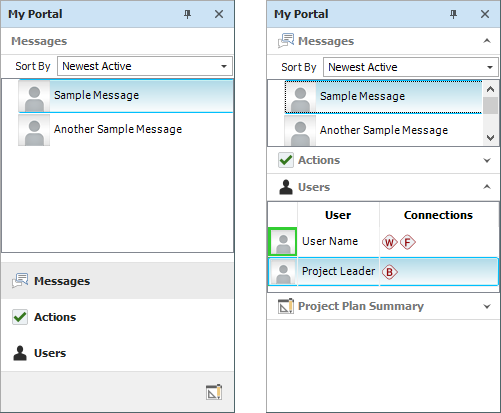
As an example, the first picture shows the My Portal panel when it is not tiled. The second picture shows the tiled panel, with two of the four pages expanded to be visible at the same time.

When the panel is not tiled, you can drag the horizontal splitter bar up to display large buttons or down to display small icons.
![]()
When the panel is tiled, you can use the handle buttons to expand or collapse each page.
![]()
Dock or Float
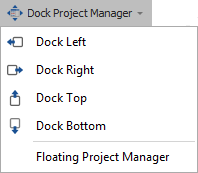
For both panels, you have the option to dock the panel on the left, right, top or bottom side of the MDI. When the panel is docked, it cannot be moved but you can change the width (if docked left or right) or height (if docked top or bottom) by dragging the edge to the desired position.
Alternatively, you can choose to float the panel as a window that can be resized and dragged to any location on the desktop.
There are several ways to set the docking position:
-
Choose View > Project Manager > Dock Project Manager and then choose the desired option.

The same options are available when you choose View > My Portal > Dock My Portal.
-
If the panel is currently floating:
-
-
Double-click the window's title bar to return it to the most recent docked position.
or -
Click the window's title bar and drag it onto one of the location icons that become visible while you are moving the window. When the window is correctly positioned, blue shading will show where the window will be docked when you release the mouse button. (Note that the window's title bar must be exactly positioned above one of these location icons before the blue shading appears. If you don't see blue shading, the panel will not be docked when you release the mouse button.)
-
![]()
If you prefer to float the window, you can:
-
Choose either:
-
-
View > Project Manager > Dock Project Manager > Floating Project Manager
or -
View > My Portal > Dock My Portal > Floating My Portal
-
-
Double-click the title bar of the docked panel.
Pinned or Unpinned
When docked, both panels can also be toggled between pinned and unpinned states by clicking the pushpin icon in the panel's title bar. When the pushpin in the icon is vertical ![]() , the panel is pinned and will be displayed at all times.
, the panel is pinned and will be displayed at all times.
When the pushpin is horizontal ![]() , the panel is unpinned. A tab will be displayed at the docking location for each unpinned panel.
, the panel is unpinned. A tab will be displayed at the docking location for each unpinned panel.
The behavior for unpinned panels is as follows:
-
If you point to the tab, the panel displays only until you point to something else.
-
If you click the tab, the panel stays displayed until you click something else.
-
When a panel is unpinned, it cannot be undocked or moved.
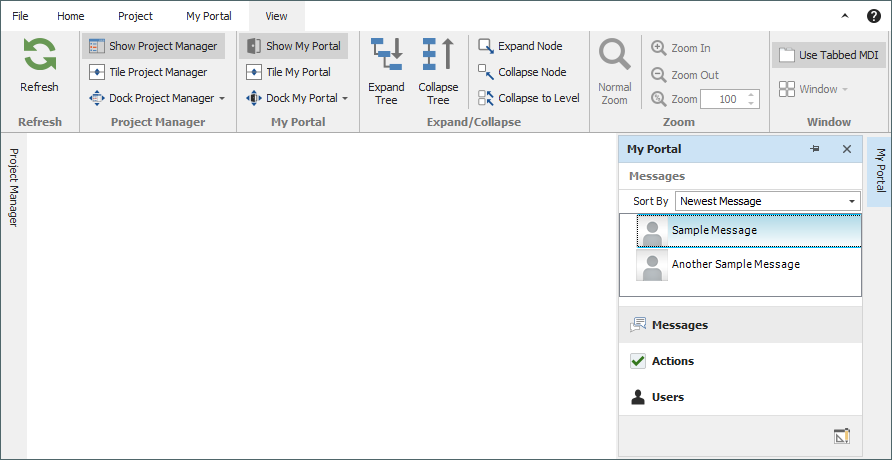
As an example, the following picture shows the Project Manager panel docked on the left side of the MDI, unpinned and hidden, while the My Portal panel is docked on the right side of the MDI, unpinned and visible (either because the user moved the pointer over or clicked the tab).
