Life-Stress Data Folio Setup
For life-stress data only.
The Accelerated Life Testing (ALTA) life-stress data folio contains the tools for performing an accelerated life testing data analysis.
To add an life-stress data folio to a project, choose Home > Insert > Life-Stress Data, or right-click the Life-Stress Data folder in the current project explorer and choose Add Life-Stress Data on the shortcut menu.
![]()
A setup window will prompt you to select a data type to use in the folio, the stresses to use and a unit appropriate for your data (the unit may be measured in mileage, distance, weight, etc.; see Unit Settings).
There are two types of data available: times-to-failure data or free-form data. In addition, times-to-failure data may contain three forms of censoring: suspensions (right censored), interval censored or left censored data. (See Accelerated Life Testing Data Types.)
Any of the times-to-failure data types can also be entered as grouped data. The ReliaWiki resources portal has more information on grouped data analysis at: http://www.reliawiki.org/index.php/Grouped_Data_Parameter_Estimation.
The first page of the Data Sheet Setup window is shown next.

Note that when you select a data type, the preview table at the bottom of the setup window will show you the names of the data entry columns that will appear in the data sheet.
If you are creating a new folio, you will also need to specify the time units appropriate for your data. Units may be measured in time, distance, weight, etc. The appropriate columns in the data sheet will be automatically configured for the units you select. If you later wish to change the time units of an existing data sheet, click the Change Units icon on the Main page of the control panel of the data sheet.
![]()
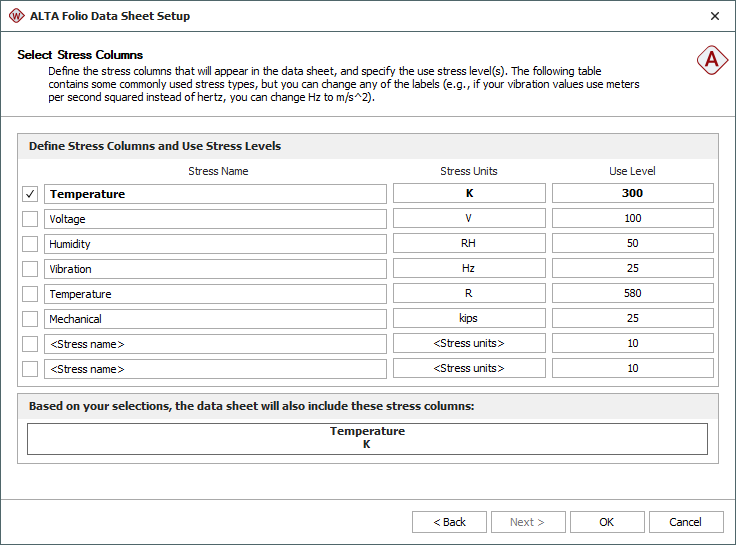
If you wish to use the same stress column and stress level settings that were used when you last set up an Accelerated Life Testing life-stress data folio—or if you are only changing the data type of an existing folio—click OK to close the window and view your folio. Otherwise, click Next > to display the second page of the window.

You can use this page to do the following:
Adjust the number of stress columns to be used in your folio by selecting the appropriate check boxes.
Every stress column represents a stress type. So, for example, a data sheet with two stress columns would be used for data obtained from a two-stress test. In this case, each row would contain a failure/suspension time and the two stress values that define the stress level at which the data point was obtained (e.g., a unit might have failed at 100 hours while tested at 343 K and 80% relative humidity).
If you would like to change the number of stress columns in a folio you have already created, click the Add or Remove Columns icon on the Main page of the folio's control panel.
![]()
Change the labels of each stress column by changing the text under Stress Name or Stress Units. These fields are merely for adding text to the headings of the stress columns, so you can keep track of which stress type is associated with each stress column. This information is not relevant to the software’s calculations.
Define the product's normal stress level by entering values under the Use Level heading for each stress type (e.g., the product that was tested under accelerated temperature and humidity might normally operate at 323 K and 50% humidity). After the folio is created, you can change this value in the Use Stress Level window.
IMPORTANT: Temperature values must always be entered in absolute units (e.g., Kelvin or Rankine). To convert temperature values in the data sheet that were entered in Celsius or Fahrenheit to absolute units, choose Life-Stress Data > Options > Convert Stress Values.
Like the first page of the setup window, there is a preview at the bottom of the page that shows you how the names of the associated columns will appear in the data sheet.