Maintenance Groups
Maintenance groups are resources that are available for use throughout the project and can be managed via the Resource Manager. A maintenance group is a set of blocks or system hierarchy items where some event within the group can trigger either maintenance or state changes for one or more blocks or items, either within the group or outside of it. You can use a maintenance group:
- In BlockSim: To turn a block on or off. State change triggers are used to activate or deactivate a block when items in one or more specified maintenance groups go down or are restored. The block whose state is being changed may or may not belong to any of the maintenance groups. This allows you to model a cold standby configuration (i.e., one where the component cannot fail when in standby) without using a standby container, which may be useful if you are using a parallel or complex configuration, as blocks can be connected only in series in standby containers.
- In BlockSim or RCM++: To trigger a scheduled task (i.e., a preventive task, inspection or on condition task). You can set the task to be performed based on events in one or more maintenance groups. Triggering events within the maintenance group can include block/item failure; start of corrective, preventive or inspection tasks; and/or block/item restoration. The block(s)/item(s) affected by the task may or may not belong to any of the maintenance groups. For example, if you want to perform preventive maintenance on Component A every time you perform corrective maintenance on Component B, then you can assign Component B to Maintenance Group 1 and then set the preventive task assigned to Component A to be performed upon the start of corrective maintenance within Maintenance Group 1. See Task Scheduling for more information on how tasks can be scheduled.
Note: When you specify a maintenance group for a subdiagram block, it applies at the subdiagram level rather than to the individual blocks within the subdiagram; for example, the subdiagram block is considered "down" only if some event within it causes the entire subsystem modeled by the diagram to go down.
Creating and Editing Maintenance Groups
The Maintenance Group window allows you to create, view and edit maintenance groups. It can be accessed by clicking the Create New or View/Edit icon in the Maintenance Group wizard, which is accessed from the Maintenance Group field in Block Properties windows in BlockSim, and in the FMRA operation properties in RCM++.
![]()
![]()
It can also be accessed from the Maintenance Groups page of the Resource Manager by choosing Home > Edit > New, by selecting a maintenance group and choosing Home > Edit > View or by double-clicking a maintenance group.
In BlockSim, it can also be accessed via the icons in the Maintenance Group Manager.
At the top of the window, you can specify the maintenance group name. You can replace the default name with your own name, if desired. To change the default names, choose File > Manage Database > Default Name Formats. (In a secure database, this is available only to users with the "Manage other database settings" permission.)
![]()
You can also enter comments about the maintenance group in this window.
For existing resources, the link at the bottom of the window indicates how many times the resource is currently being used. If you need more information, click the link or the icon to open the Dependency Viewer.
![]()
Assigning Maintenance Groups
In RCM++, system hierarchy items can belong to maintenance groups. To assign an item to a maintenance group, select the item in the FMRA and go to the Operation heading in the Properties tab. See Setting the Operation Properties for an FMRA in the XFMEA/RCM++ documentation.
In BlockSim, certain types of blocks can belong to maintenance groups. You can assign an individual block to a maintenance group in the Block Properties window, or you can use the Maintenance Group Manager to define the group membership. Blocks that belong to a maintenance group have a circle at the upper left corner of the block. You can change the size of the indicator via the relevant Block Corner Indicators page of the Diagram Style window. You can change the color used for each maintenance group via the Maintenance Group Manager.
Maintenance Group Manager
In BlockSim only, the Maintenance Group Manager allows you to add blocks to or remove blocks from a maintenance group without having to go into each block's properties individually. This window can be accessed by choosing Project > Data Management > Maintenance Group Manager or, when you are viewing the Maintenance Groups page of the Resource Manager, by choosing Home > Actions > Maintenance Group Manager.
![]()
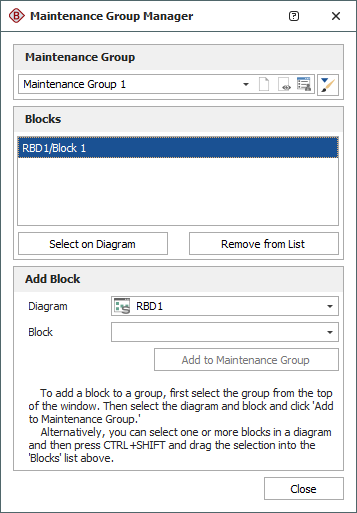
The Maintenance Group area allows you to choose an existing maintenance group from the drop-down list. In addition, you can click the Select Existing icon to open the Select Resource window. If there is not an existing maintenance group that meets your needs, you can create a new one by clicking the Create New icon to open a window that allows you to specify a name for the new maintenance group, as well as any comments. Click the View icon to view the characteristics of the selected maintenance group.
![]()
You can also click the Indicator Style icon to modify the appearance of the corner indicator that will appear on each block that belongs to the maintenance group, including:
- The indicator's background color, fill color and fill style. The background color is the underlying color applied to the indicator; the fill color is applied over the background color in the pattern specified by the fill style.
- The style (e.g., solid, dash, etc.), color and thickness of the indicator border.
You can change the size of the indicator via the relevant Block Corner Indicators page of the Diagram Style window.
The Blocks area displays all of the blocks in the maintenance group, in the format [Diagram Name]\[Block Name].
- To add a block to the maintenance group, you can select the diagram and block in the Add Block area and click the Add to Maintenance Group button. You also can select the block(s) in the diagram, press CTRL+SHIFT and drag the block to the list in the Blocks area of the Maintenance Group Manager.
- To view a block in the maintenance group, select the block in the list and click the Select on Diagram button. The diagram will be displayed with the block selected.
- To remove a block from the maintenance group, select the block in the list and click the Remove from List button.