Creating and Selecting Resources
This topic describes how to use resource wizards to create and edit resources while you’re performing an analysis or creating a URD. In addition, you may also need to:
-
Use the Resource Manager to see all of the resources that are available to use in the current project. In addition to creating and editing resources, the manager also allows you to:
- Delete resources that are no longer needed.
- Create global resources that are available to all projects in the database.
- Publish a model that is linked to an existing analysis.
(In a secure database, the ability to create, edit and delete resources is available only if the user a) is the project owner, b) has the applicable "resources" permissions, or c) has the applicable "manage all projects" permissions.)
Opening a Resource Wizard
Throughout all ReliaSoft desktop applications, the availability of a resource wizard is usually indicated by an ellipsis (...) or an arrow in the resource field. Simply click twice in the field to open the wizard.

Tip: If a resource is already assigned in the field, you can edit it directly without opening the wizard by clicking the Edit icon that appears in the field.
Back Arrow and Main Page
Each wizard contains multiple pages with different options on each page. If the option you need is not immediately visible, you can click the Back arrow to see the Main page, which shows all the options that are applicable for the current situation.
![]()
As an example, the following pictures show some of the different options that will be available on the Main page for specific situations and resource types.
|
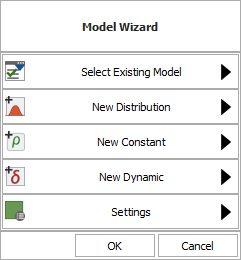
If a model hasn't been defined...
|
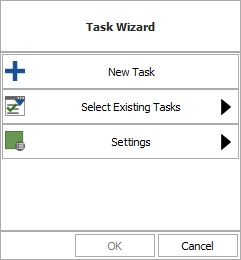
If a task hasn't been defined...
|
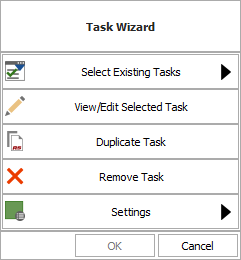
If a task has already been defined...
|
Selecting an Existing Resource
The Select page of the wizard displays a list of existing resources that meet the criteria specified on the Settings page. You can then further limit the list by typing inside the text box.

As an example, the following pictures show a situation in which the settings are configured to display up to 2,000 models (more resources take longer to load) from the current project only (called local resources), and the user has selected to see only the ones in which the name includes “bulb.”
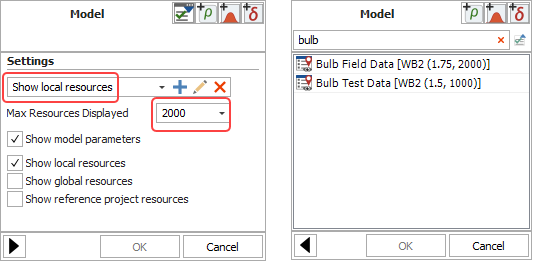
In addition, for model resources only, you must specify whether you want to display the model parameters in the list (which also takes longer to load).
To change the initial criteria for the list, click the Back arrow and then click the Settings button on the main page.

Alternatively, if you need more information about the available resources and/or a wider range of filtering tools, you can click the icon to open the Select Resource window.
![]()
Creating a Resource
In most wizards, you can click the Create New button or icon to create a new resource.
![]()
In the model wizard, click the button or icon for the type of model you want to create:
![]() New Constant
New Constant
![]() New Distribution
New Distribution
![]() New Dynamic
New Dynamic
![]() New Profile (available only when creating a cost or duration model for use in a spare part pool)
New Profile (available only when creating a cost or duration model for use in a spare part pool)
Editing a Resource
If a resource has already been assigned, you can view and/or edit its properties by clicking the View/Edit button or icon in the field or in the wizard.
![]()
Any changes you make will apply everywhere that the resource is used. This includes analyses in other ReliaSoft applications.
Removing a Resource
If a resource has already been assigned, you can remove it from this location by clicking the Remove button or icon.
![]()
The resource will remain in the database for use in other locations. If you want to completely remove a resource from the database, you’ll need to use the Resource Manager or Select Resource window.